DNA Extraction from Chicken Liver Cells, 2019
Can DNA be extracted from cells? Since DNA is the blueprint for life, everything living contains DNA. DNA isolation is one of the most basic and essential techniques in the study of DNA. The extraction of DNA from cells and its purification are of primary importance to the field of biotechnology and forensics. Extraction and purification of DNA are the first steps in the analysis and manipulation of DNA that allow scientists to detect genetic disorders, produce DNA fingerprints of individuals, and even create genetically engineered organisms that can produce beneficial products such as insulin, antibiotics, and hormones.
DNA can be extracted from many types of cells. The first step is to lyse or break apart tissue and cells in order to help increase the surface area to create a better solution for enzymatic reactions to occur more efficiently. Secondly, salt, water, and detergents are used to help break down membranes and help release DNA from the cells. Thirdly, enzymes such as bromelain and/or papain found in meat tenderizers are used to break down any proteins from the DNA. Finally, isopropyl alcohol is added in order to create a “window” for DNA to appear in because DNA has a similar density as isopropyl alcohol (unlike carbohydrates, fats, and proteins which will settle to the bottom of the solution along with other cellular “junk”). One will not see DNA as single molecules but instead as hundreds of strands of DNA collectively clumped/strung together. The hypothesis is that if one were to lyse liver cells, then nucleic acids such as DNA can be observed.
|
|
|
Materials:
|
Stock Table:
Chicken Liver Solution:
Fresh Chicken Liver (567g or 20oz) Scale (with Weighing Boat(s)) Knife Cutting Board Blender Non-Ionized Salt Only (ie canning salt) / pre-measured Distilled Water (room temperature with 400 mL Beaker) Liquid Detergent (ie Dawn) in 250 mL Beaker with Dropper(s) Meat Tenderizer (ie Adolph’s)
Chilled Isopropyl Alcohol 90%+ in 250 mL Beaker with Dropper(s) |
Students:~ 2-3 / Group
Chicken Liver Solution (pre-made) 100 mL Beaker 250 mL Beakers 20 x 150 mL Test Tube Stirring Rod Funnel Pre-Cut Cheesecloth (10 cm x 10 cm) Test Tube Holder References
|
Procedure: For about 16 Groups of ~ 2-3 Students Each
Class: Teacher Driven
1. Using a scale and weighing boat, ~30g of pre-measured chicken liver is placed into a blender.
2. Using a scale and weighing boat, ~5g of pre-measured non-ionized salt is placed into the blender. The salt will help break down the cellular membranes.
3. Using distilled water at room temperature, 400 mL of water is placed into the blender. The water will help create a desired solution.
4. The contents are then blended on high (lid on) for 15-20 seconds. The blender separates and breaks up the liver tissues and cells to help increase surface area for further breakdown and reactions.
Group: Student Driven (~ 2-3 Students per Group)
5. Using a 100 mL beaker, collect about 20 mL’s of the liver solution.
6. Place a funnel on top of a 250 mL beaker then place a piece of pre-cut cheesecloth on top of the funnel. Slowly pour all of the liver solution through the cheesecloth so that the filtrate collects inside the 250 mL beaker in order to get rid of the undesirable tissues from the blending. Once filtered, remove funnel and discard the cheesecloth in the trash.
7. Using an eyedropper, add about 2 dropper “fulls” (press the bulb on the dropper in and release) of the liquid detergent to the 250 mL beaker with the liver filtrate. The detergent will help lyse (break down) the cellular and nuclear membrane by emulsifying (separating (not breaking apart)) the fats (phospholipids) that make up the membranes in order to release the DNA. Using a stirring rod, slowly stir the mixture for about 1 minute (try to prevent suds). Let the mixture sit for about 4-5 minutes.
8. Using your fingers, add 3 heaping pinches of meat tenderizer containing the necessary enzymes (bromelain and/or papain) to the 250 mL beaker containing the filtered/soapy liver solution. Meat tenderizer enzymes help to cut the proteins (histones) away from the DNA. Using a stirring rod, stir the mixture vigorously for 30 seconds. Let the mixture sit for about 4-5 minutes.
9. Pour all of the mixture from the 250 mL beaker carefully into a test tube.
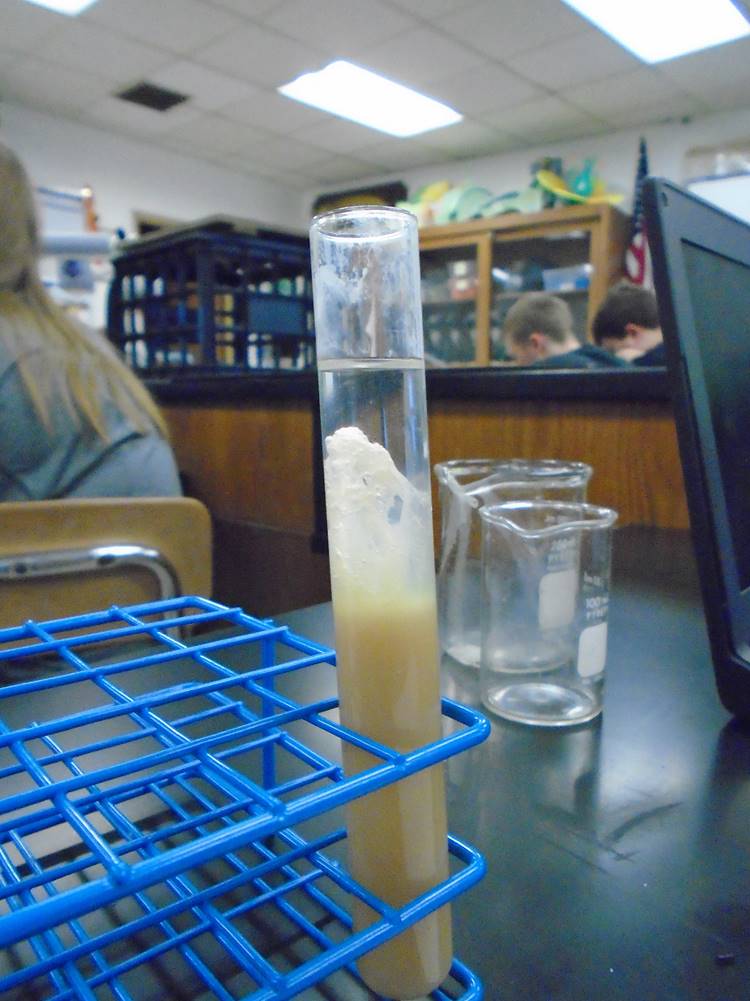
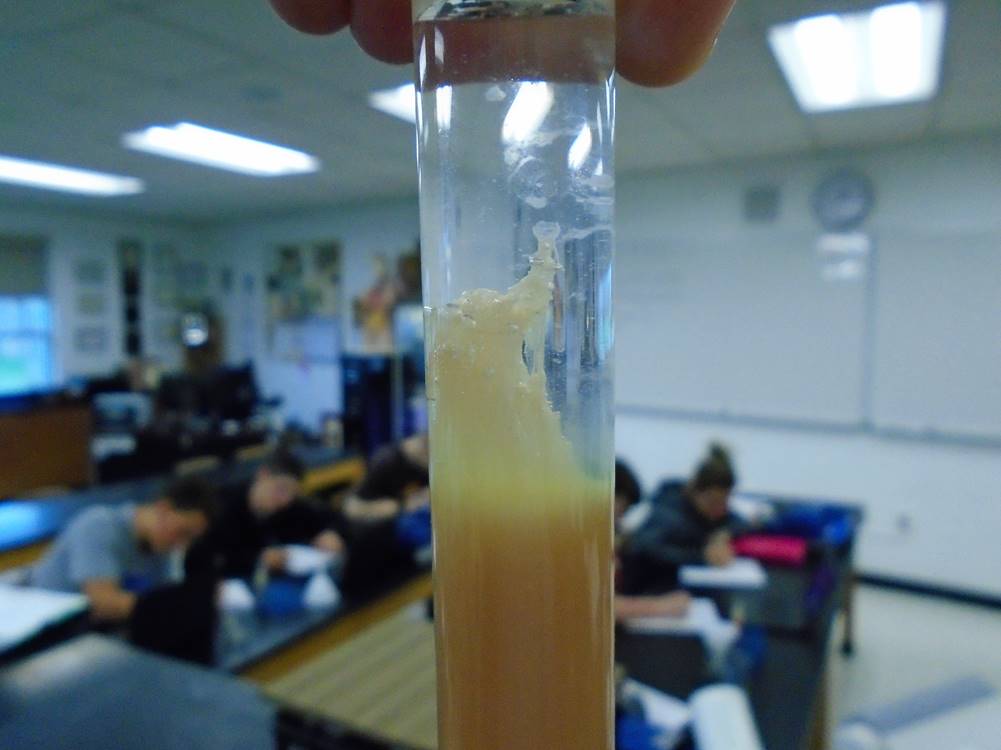
9. Alcohol is less dense than water, so it floats on top of a solution forming two separate layers. All of the fats and the proteins that were broken up in the first few steps will move to the bottom, watery layer. DNA will rise into the alcohol layer or “window” from the solution layer
because the density of DNA is similar to that of the alcohol.
To do last step, follow the preceding directions VERY carefully:
* Tilt your test tube and slowly add 6-7 droppers full (press the bulb on the dropper in and release) of cool isopropyl alcohol into and along the side of the tube; do not over fill.
* Place the test tube in a test tube holder so not to disturb the reaction.
* The DNA should slowly appear in the “alcoholic window” within seconds as a “lightly tan colored strands or clumps” 1000’s of DNA molecules.
Answer the questions on the Result sheet, only then clean and dry all materials as directed.