Using
the Compound Light Microscope
Introduction
What kinds of information can a compound microscope provide? A light source illuminates the object to be seen. That source can be a mirror, or the instrument can be self-illuminating. As light passes through the object, the lens nearest the object, called the objective lens, produces an enlarged image of the object in the primary image angle. The lens that you look into, the ocular lens, acts as a magnifier and produces an enlarged image of the image produced by the objective lens. To ascertain magnification, simply multiply the eyepiece magnification, usually 10X, by the magnification of the objective lens, usually 4x, 10x, 40x and 100x. For example, a 10x ocular lens in conjunction with a 40x objective, will give you a magnification factor of 400. The object will be magnified 400 times larger than you can view it with the naked eye. When looking through the ocular lens, it is best to open both eyes; this will take practice.
Select the proper objective for the magnification you desire by rotating the turret or nosepiece such that the objective is in alignment with the ocular lens. You will hear a "click" signaling you are in the proper position. Place your slide on the stage and secure it with the stage clips (optional), or with a mechanical stage, if so equipped. Try to align the specimen as near to the center of where the objective will come down. This will make it easier to locate when viewing through the ocular lens. Before looking through the ocular lens, turn the coarse focus knob, which will lower the objective, until the objective is almost in contact with the slide. The purpose for this is simple. If you are looking through the ocular lens and you move the objective downward, you run a very high risk of contacting the slide with the objective and damaging one or both of them. Slides are cheap, objectives aren’t. By starting in the lowered position, your focus will bring the objective up, away from any potential damage. As you turn the coarse focus knob, your specimen will come into focus. If so equipped, once you have the best focus possible with the coarse, use the fine focus for detailed adjustments.
Most microscopes are equipped with a diaphragm of some sort. This is located directly below the stage, but above the light source. Usually diaphragms are of two types: a disc diaphragm (a disc pre-drilled with holes, from smaller to larger, that you dial in the appropriate light) or a better choice, the iris diaphragm (which, like a camera lens, offer unlimited adjustment). Depending upon your specimen, more light or less light may be required for the best viewing. Once you have focused with a particular magnification, you will want to view the specimen under different magnifications. Simply rotate the nosepiece until the objective you require is in line with the ocular lens. Note: the “field of view” is the total circular area that you are viewing when looking through the lens.
Remember to follow a few basic rules when you are using a microscope including: carrying the scope with two hands, start and end on the low objective, start with the coarse focus and then use the fine focus and never push down on the stage. The hypothesis is, if one were to practice using a compound microscope, then the microscope will be easier to understand and use.
Procedure
Materials
|
Per Group:
Compound Light Microscope Blank Glass Slide Cover Slip Small-Printed Text (optional: newspaper) Scissors Stage Micrometer Slide (#94 W9910)
|
Class:
250 ml Beaker (to hold water for class) Eye Dropper(s) (use with 250mL beaker)
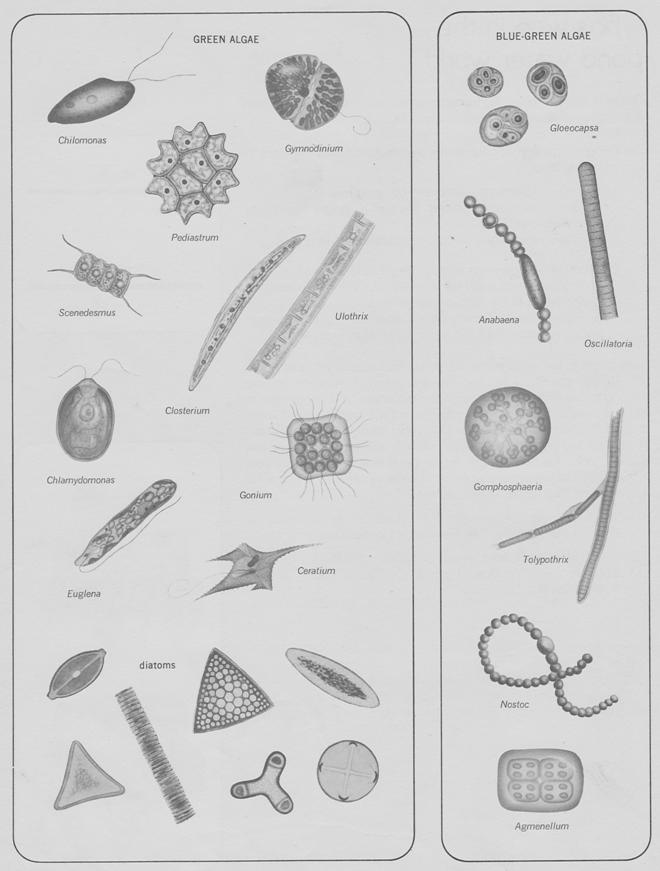
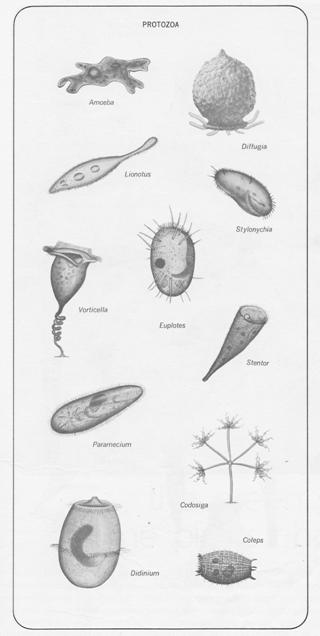
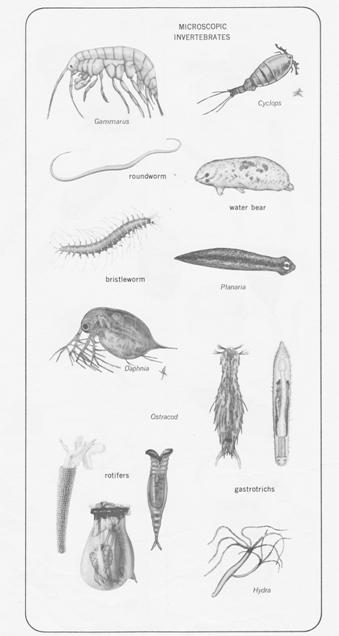
Pond Water Reference Handouts (ie Protozoa) |
Steps
Part I: Slide Preparation: Making a Wet-Mount
1. Gather your “group” materials (not Stage Micrometer (slide box) at this time).
2. Use scissors to cut out a square of only one letter or number.
3. Place the paper square with the one letter or number on a blank glass slide.
4. By using the class beaker of water, use an eyedropper to place a drop (1) of water on the one letter or number paper. (note: if letter/number flips, turn it around)
5. Add a cover slip at an angle to prevent air-bubbles from appearing. (see diagram)

6. Place the slide on the stage of a compound microscope; do not use the stage clips. Do not clean, the slide will be used for Part II.
Part II: Microscope Use: Focusing and Recording
7. Starting with the lowest objective (4x) and using the “coarse focus” first and then the “fine focus” second, bring your letter or number into focus. Try placing one finger on the slide to move it slowly, while using your other hand on the focus knob at the same time. Starting with the lowest objective and using the focus knobs in this order helps to locate and narrow down your specimen (letter or number) for easier and faster viewing.
8. Demonstrate your ability to lighten or dim the image by finding the diaphragm under the stage and making the image light then dark; adjust it finally to your needs.
9. Note that the “circle” that contains the paper and light is called the “field of view”.
10. Using the answer sheet provided, draw what you see under the 4x “field of view”.
11. Using the answer sheet provided, draw what you see under the 10x “field of view” by slowly rotating the revolving nosepiece of the microscope in place. Refocus if necessary.
* Dry the blank slide and cover slip and place them in the designated area.
Part III: Calculating “Field of View”: Measuring (Note (1 cm = 10 mm’s); (1/1000 mm = 1 micrometer))
12. The perfect instrument for measuring an object under the microscope is to use a “stage micrometer”. Carefully, remove the stage micrometer slide #94W9910 from your slide box and replace and dry the “blank prepared paper letter/number slide” that you used earlier (you don’t need the blank slide anymore).
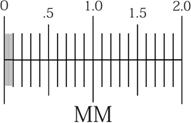
Note:
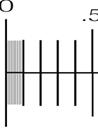
· This Micrometer Slide is a 2 mm (millimeter) scaled instrument.
· Notice .1 mm divisions and smaller .01 mm divisions on it:
13. Set your “field of view” to low power (4x). Find and focus on the lines on the “stage micrometer” and align it along the “horizontal center” of the “field of view” (see diagram below)
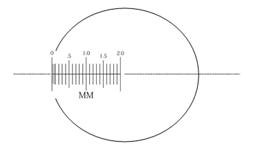
14. Using the answer sheet provided, find the distance across each of the following objective magnifications (4x, 10x, and 40x). You will have to move each of the objectives into place and then realign/refocus the stage micrometer as directed in (step 13) for the 10x and the 40x objectives.
15. Using the answer sheet provided, finish answering all the questions (1-10) on the “answer sheet” provided. If time allows, go on to the next sections.
* Place Micrometer Slide back into the slide box and return box to the designated area.
Part IV: Viewing Single and Multicellular Organisms: Protozoa
|
|
|
|


16. Starting from a clean slide and cover slip, prepare a water-mount by placing a drop of pond water onto the slide and a cover slip.
17. Using your microscope skills and references/pictures of protozoa provided, find as many micro-plants and micro-animals (protozoa) that you can.
18. Be sure to get a sample with some green/brown plant material since a lot of protozoa like to stay in the confines of plants. Also, look at as many slides as possible by collecting samples from the top, side, and bottom of the container.
19. Using the answer sheet provided, complete the required drawing and measurement of “one” organism.
20. Clean, dry and put away all materials as directed in class.