2015 Chia Sculptures
Introduction
Can one make, sculpt, and nurture a self-made Chia Sculpture? Chia seeds are typically small ovals with a diameter of about one millimeter. They are mottle-colored with brown, gray, black and white. Chia seeds typically contain 20% protein, 34% oil, 25% dietary fiber. The oil from chia seeds contains a very high concentration of omega-3 fatty acid. Chia seed is traditionally consumed in Mexico, the southwestern United States, and South America, but is not widely known in Europe. Historically, chia seeds served as a staple food of the Nahuatl (Aztec) cultures of Central Mexico. Jesuit chroniclers referred to chia as the third most important crop to the Aztecs behind only corn and beans. Tribute and taxes to the Aztec priesthood and nobility were often paid in chia seed. If one were to plant chia seeds using a method of creating a unique sculpture, then the seeds will sprout to become the “hair” for that sculpture.
Procedure:
Materials
|
Pre-Soaked for 1 Hour Chia Seeds Nylon Stocking Miracle Grow Gardening Soil - Water Retaining Brand - Best Dixie Cup Spoon Bowl or Container Cellophane |
¼ Cup Measuring Device Rubber Bands or String Scissors Wiggle Eyes Glue Permanent Marker Masking Tape
|
Steps:
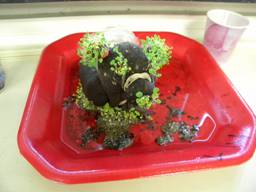
1. Fill the end of the stocking with approximately 3/4th full of gardening soil using the ¼ cup measuring device; perhaps best done outside. Fill it loosely, to allow you to shape your sculpture. Twist off and tie off small sections of soil using rubber bands or string to form legs, head, flippers, wings, etc…. in order to create your “animal” sculpture (sorry cannot do a worm/ snake or similar symmetries). Cut off and trim any access nylon if necessary with a pair of scissors.
2. Place the sculpture in water or under a faucet in order to soak the soil to saturation; if necessary, re-sculpt your creation and/or make any adjustments. The moisture will help your seeds to stick to the surface of the stocking. Place the sculpture in a designated bowl or container.
3. With a spoon, place the prepared seeds on your stocking sculpture where you want "hair" to grow.
4. Use a permanent marker and write your name(s) on the container. Place a pieced of cellophane gently on top of your project very loosely to help retain moisture. You may want to add a little water inside the container to help retain moist soil.
5. Growth in about 1 week. Be careful “not” to over water the sculpture; however, keep it moist daily and provide fresh water very often in the container to prevent mold.
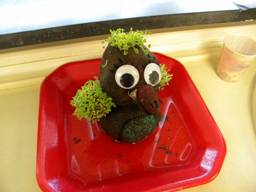
6. Glue on wiggle eyes for your sculpture, if you made an animal for example preferably the next day when the sculpture is dryer.
Note: May need to Water with a solution of 1 teaspoon Clorox to 1 gallon water to kill any mold.
|
Bear |
Bird |
|
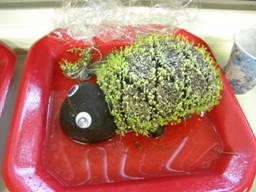
Turtle |
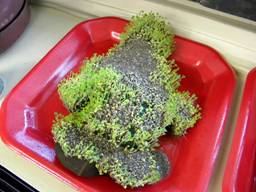
Starfish |